
This series of blogs about including art in the Sunday Church School will offer a variety of art techniques and ideas. Each week will focus on one medium, offering a tutorial for one project (which can be used at multiple age levels), as well as several other suggested ways to incorporate the medium in other projects. The purpose of the series is to offer Sunday Church School teachers ideas which they can keep in mind for future reference as they plan to use art in their classroom. Each technique can be applied to a variety of lessons, whether Bible stories, Church history, lessons on the Faith, etc. For the purpose of keeping it simple, the cross will be used in each illustration throughout the series.
One important art medium, which is often overlooked or taken for granted is paper. It is frequently used as a base on which to apply other mediums. However, the very paper itself can be used in many ways as an art medium. Here is one of them, “painting” with tissue paper.
Brightly colored tissue paper pieces can be applied to wet watercolor paper, allowed to dry, and then carefully lifted off, leaving their color behind on the page. See http://www.fantasticfunandlearning.com/tissue-paper-art.html for details and directions on how to use a spray bottle as the means of moistening the paper. This method creates a beautifully colored sheet of paper which can be used as a background for other art, or can itself be cut into a shape/shapes to use in your finished project as illustrated here: http://kidsartists.blogspot.com/2010/12/colourful-christmas-trees.html.
However, if only a portion of the paper is made wet and covered with tissue paper pieces, a design can be “painted” with the color of the tissue paper pieces. This is the method which will be illustrated in this blog. To complete this project, you will need watercolor paper, a pencil, a template or ruler (if needed for your design), bright tissue paper (pass over the kind that specifically says “no bleed” on the packaging – you want the kind that bleeds!), a paintbrush, cardboard, and a container of water.
Begin with a piece of watercolor paper, a template or ruler (if needed), and a pencil.
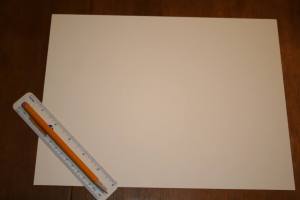
Use the pencil to very lightly trace the template or draw the image onto the paper.

Tear up the brightly colored tissue paper into the size and shape of your choice.

Set the watercolor paper on some cardboard, to absorb the extra moisture and “bleed” before you begin this next step. Then, use a paintbrush dipped in water to wet the portion of the watercolor paper (either inside or outside of the pencil sketch) which you want to “paint” with the tissue paper’s color.

Carefully set the tissue paper pieces atop the wet portion of the watercolor paper. They should overlap if you want their colors to blend.

After the to-be-colored portion of the watercolor paper is completely covered in tissue paper pieces, wet the paint brush again and gently paint over the tissue paper to completely moisten the pieces.

Allow the project to dry.

Carefully pick off the tissue paper scraps and reveal the beautiful colored image beneath!


Age-leveled suggestions:
Preschool: This method is a great way for preschoolers to learn about art and to practice tearing paper. See http://theimaginationtree.com/2012/02/tissue-paper-bleeding-art.html for more about that. Preschoolers will need a very basic shape to “color” with the tissue paper, and will need assistance with the painting. A preschool teacher may consider cutting out their finished shape or having a pre-cut shape to glue atop the students’ “painting” instead of trying to keep the painted area limited to the shape.
Elementary: These students will be able to follow the directions as they are, to complete this project. They will enjoy the challenge of keeping the tissue paper “paint” within the lines.
Middle/High School: These students will be more precise with their tissue paper, regulating the piece sizes and perhaps even cutting the paper into shapes that enhance the finished project. They will likely pay better attention to evenly spacing the colors and may even be careful to avoid putting colors together that are opposites on the color spectrum, whose blended “bleed” would create a dull grey or muddy brown. Their years of experience with art will allow them to create a finer finished project.
***
Following are suggestions of other art project ideas using paper as the main medium:
***
Colored paper can be torn to create any shape, and then glued to another piece of paper, to create a picture. See http://www.artwithmsgram.com/2013/01/van-gogh-sunflowers-2nd.html for an example.
***
Colored tissue paper can be torn or cut, then glued directly on paper, or wadded up and glued for a more three dimensional effect. See http://suffieldart.blogspot.com/2012/04/georgia-okeeffe-inspired-tissue-paper.html#comment-form. Colored tissue pieces can also be used to create a stained-glass effect, outlined by black paper cutouts, as illustrated at http://mosswoodconnections.com/stained-glass-art-activity/.
***
Use paint chips as part of your artwork. Here is how one artist did so: http://www.oopsicraftmypants.com/2009/10/paint-chip-city-art-journal-page.html.
***
Painted paper, once it has dried, can be cut to shapes that can be glued together to create an image. See http://www.fabdiy.com/diy-handmade-colorful-panel/. A similar effect involves the use of magazine pictures or pieces of magazine pages. See http://craftsbyamanda.com/2011/09/fall-magazine-tree.html for one example.
***
Different types of papers can combine to create an effect. For example: bright tissue paper creates the sunset background, while pieces cut from newspaper create the forefront buildings here: http://gretchenbuwalda.blogspot.com/2014/11/kandinsky-skies-k5.html. Or, the effect can be reversed, as illustrated here, where bright colored paper pieces create the focal shape, and pieces of newsprint create the background: http://nancystandlee.blogspot.com/2012/07/mixed-media-torn-paper-collage-painting.html.
***
Create a collective artwork piece by allowing each student to illustrate a single sticky note. Display all of the sticky notes together as one piece of art. Here’s one version: http://media-cache-ec0.pinimg.com/originals/65/fb/a7/65fba758a3b47c6e274f878c4a5b8e00.jpg.
***

Pingback: Lenten Sundays Series: The Sunday of the Veneration of the Holy Cross | Orthodox Christian Sunday Church School Teachers
Pingback: While at Home: Choosing to Make the Most of Bonus Family Time | Orthodox Christian Parenting